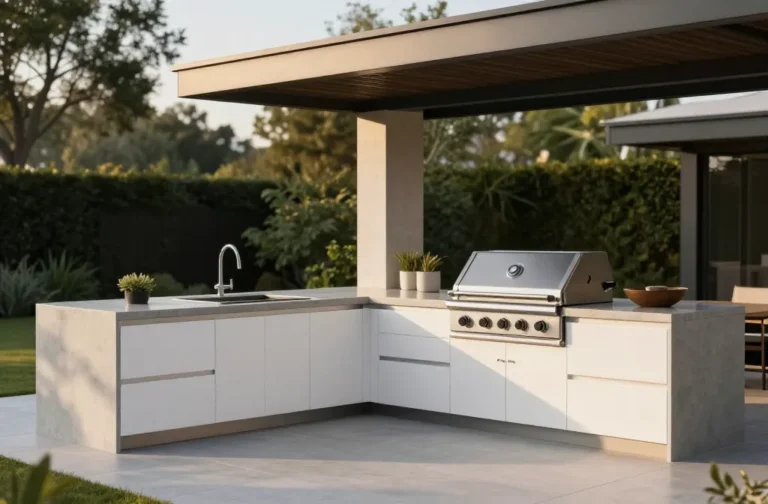
10 DIY Outdoor Patio Kitchen Ideas Under $500 That Actually Look Amazing
You don’t need to blow your savings to create an outdoor kitchen that’ll make your neighbors jealous.
These budget-friendly patio setups prove you can cook, entertain, and live your best alfresco life without maxing out your credit cards. We’re talking real style, actual functionality, and zero builder quotes required.
Each of these designs comes in under $500, and trust me, they don’t look cheap. From sleek modern stations to cozy farmhouse vibes, there’s something here for every backyard and every skill level.
Grab your drill and let’s transform that sad, empty patio into the outdoor entertaining space of your dreams.
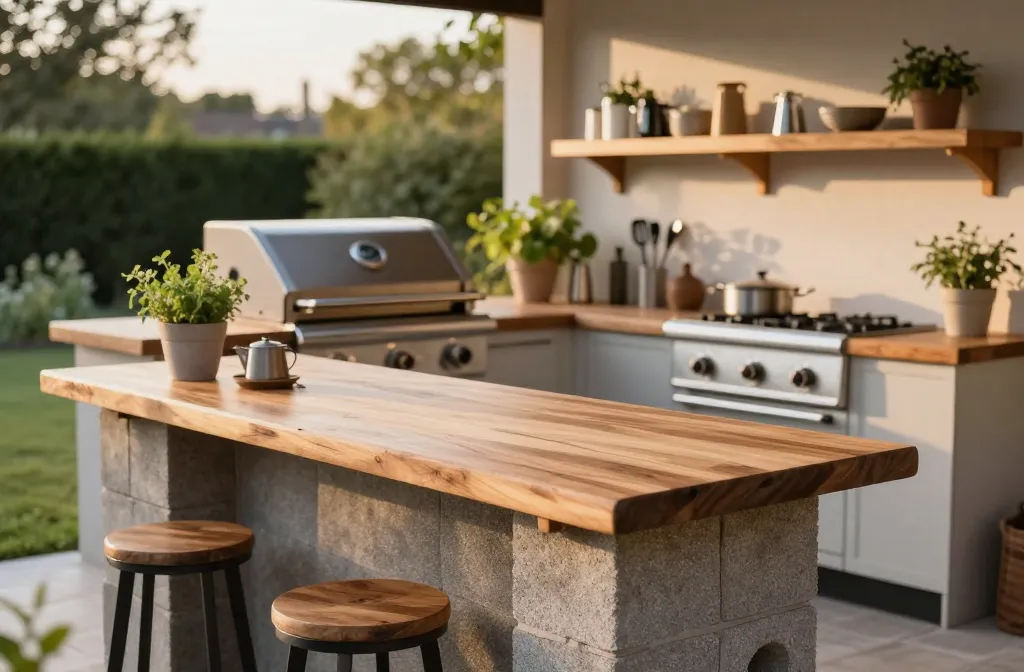
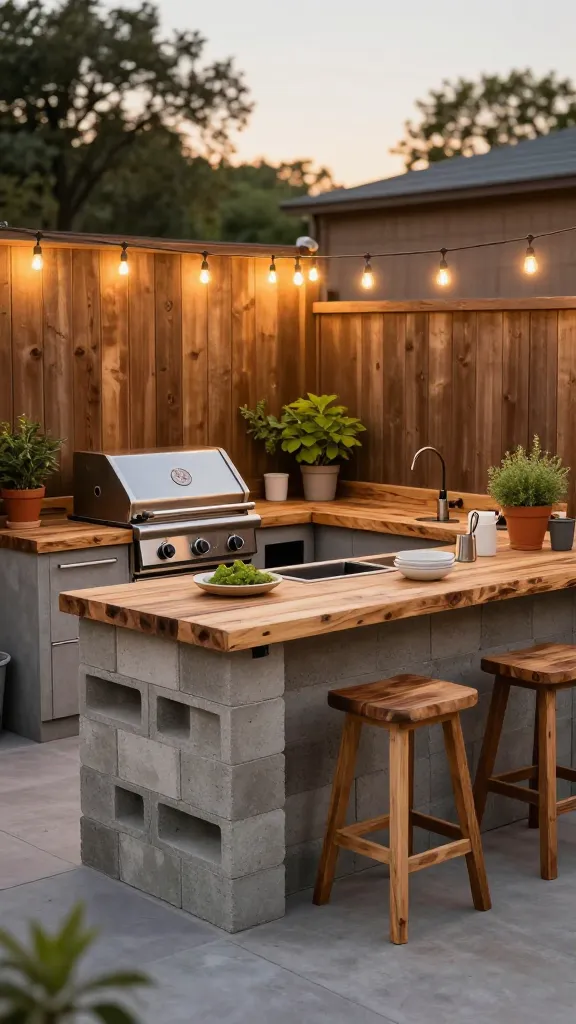
1. The Cinder Block Island With Butcher Block Top
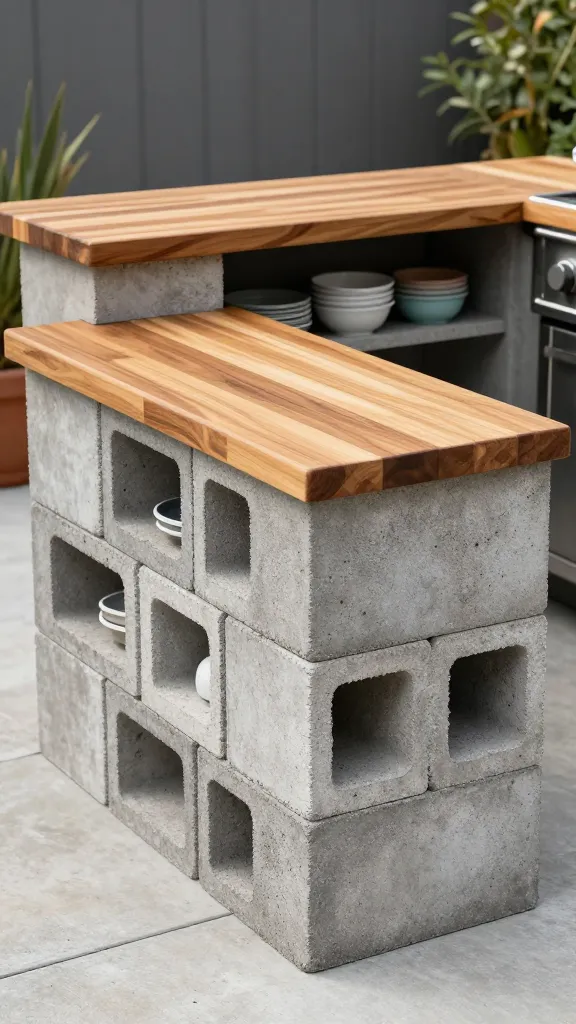
This industrial-chic setup uses concrete cinder blocks as the base and tops them with a gorgeous butcher block countertop. The blocks cost around $2 each, and a quality butcher block slab runs about $150-200.
Stack the blocks in a U-shape configuration to create storage cubbies for your grilling tools, propane tanks, and outdoor dishware. The open design keeps everything accessible while adding serious visual interest. Seal the butcher block with food-safe oil and you’ve got a prep surface that rivals indoor kitchens.
Pro Prep Tip
To keep your butcher block pristine outdoors, re-apply food-safe mineral oil once a month during summer. Water should bead up on the surface—if it absorbs, it’s time to re-oil!
What You’ll Need:
- 60-80 cinder blocks ($120-160)
- Butcher block countertop, 6 feet ($150-200)
- Concrete adhesive ($15)
- Food-safe mineral oil ($10)
- S-hooks and hanging rails ($20)
This setup works brilliantly for modern and industrial spaces. The raw concrete against warm wood creates that Pinterest-perfect contrast everyone’s obsessing over right now.
2. The Repurposed Dresser Grill Station
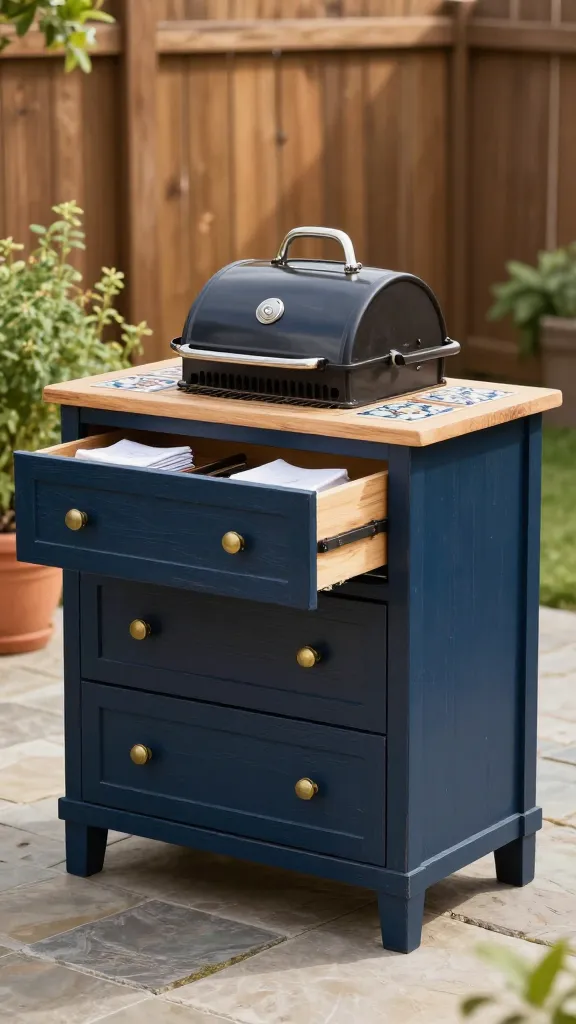
Hit up your local thrift store and grab an old wooden dresser for $50-100. Cut out a hole in the top to fit a small charcoal grill or portable burner, and suddenly you’ve got a vintage-inspired cooking station with built-in storage.
Paint it in a weatherproof exterior paint (navy blue or forest green looks incredible), replace the hardware with new pulls, and add tile or a heat-resistant mat around the grill opening. The drawers hold everything from utensils to napkins to charcoal bags.
Watch the Heat! Wooden dressers are flammable. Always ensure there is at least a 2-inch clearance between the hot grill casing and the wood, and use a high-quality heat-resistant mat or tile barrier.
Budget Breakdown:
- Vintage dresser ($50-100)
- Exterior paint and primer ($40)
- New hardware ($25)
- Heat-resistant tile or mat ($30)
- Portable charcoal grill ($80-150)
- Weatherproof sealant ($20)
This one’s perfect for cottagecore enthusiasts and anyone who loves giving old furniture new life. Plus, you can move it around your patio as needed.
3. The Pallet Wood Bar Cart Kitchen
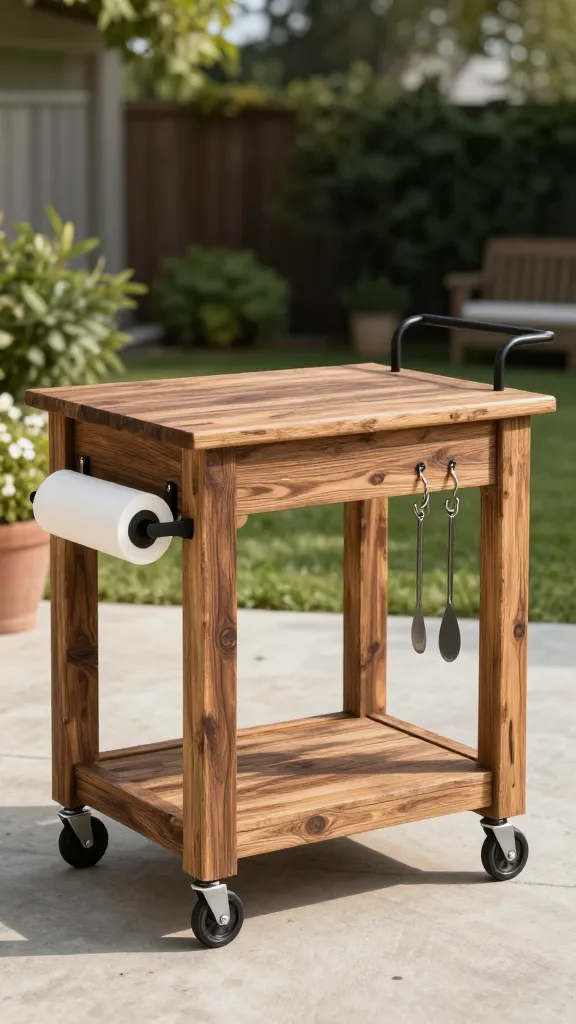
Free pallets from behind stores transform into a mobile outdoor kitchen on wheels. Build a two-tier cart with a lower shelf for storage and an upper surface for prep work. Add industrial casters so you can roll it wherever the party’s happening.
Sand the pallets smooth (seriously, no one wants splinters while making burgers), stain them in a rich walnut or leave them natural for that rustic vibe. Mount a paper towel holder on one side, add hooks for hanging tools, and you’ve created the most functional $100 you’ll ever spend.
Essential Components:
- 3-4 wooden pallets (free or $20)
- Heavy-duty casters with locks ($40)
- Wood stain and sealant ($35)
- Screws and hardware ($25)
- Hooks and accessories ($30)
Why Add Casters?
- Chase the shade during hot days
- Roll away to protect from rain
- Opens up patio floor space instantly
Keep It Stationary If…
- Your patio has unlevel pavers
- You plan to use heavy stone tops
- You have a permanent gas line
The mobility factor makes this ideal for small patios or anyone who likes to rearrange their outdoor space constantly. Roll it out for parties, tuck it away when not in use.
4. The Galvanized Tub Sink Station
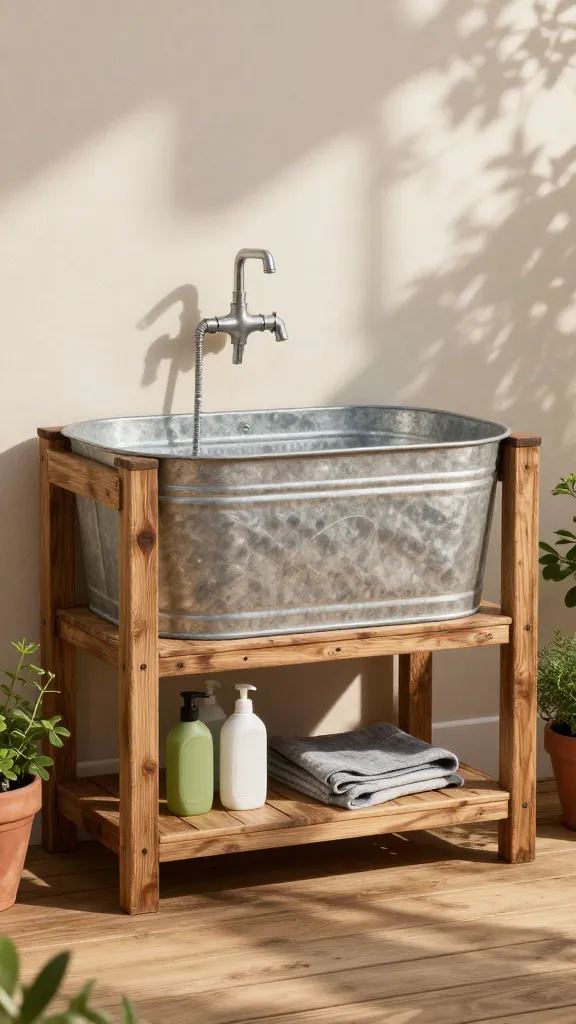
Create a dedicated washing and prep area using a large galvanized metal tub mounted into a simple wooden frame. Add a basic outdoor faucet attachment that connects to your garden hose, and you’ve got running water without complicated plumbing.
Build a simple frame from pressure-treated lumber, cut a hole for the tub to nest into, and add a shelf underneath for dish soap and cleaning supplies. The farmhouse aesthetic works with literally every outdoor decor style.
Shopping List:
- Galvanized metal tub ($45)
- Pressure-treated 2x4s ($80)
- Garden hose faucet attachment ($35)
- Outdoor-rated plywood for shelving ($40)
- Screws and wood stain ($30)
- Drain hose and bucket ($25)
The average number of trips an outdoor sink saves you from making in and out of the house during a single backyard barbecue.
This station solves the biggest outdoor cooking headache: constantly running inside to wash vegetables or rinse dishes. Your indoor kitchen will thank you.
5. The Concrete Block and Reclaimed Wood L-Shaped Setup
Go bigger with an L-shaped configuration that creates defined cooking and serving zones. Use concrete blocks as supports and top them with reclaimed barn wood planks for that rustic-meets-modern aesthetic everyone’s after.
One leg of the L holds your grill and becomes the cooking zone. The other side functions as a serving bar with overhead string lights and a few bar stools. The whole setup hugs a corner of your patio and maximizes space brilliantly.
Key Elements:
- Concrete blocks ($200 for full L-shape)
- Reclaimed wood planks ($150-200)
- Construction adhesive and screws ($30)
- Wood sealer ($25)
- Solar string lights ($35)
This design works wonders for entertaining because it naturally separates the hot grill zone from where people gather. No more guests hovering over your shoulder while you’re trying to flip steaks.
6. The Vertical Garden Prep Wall
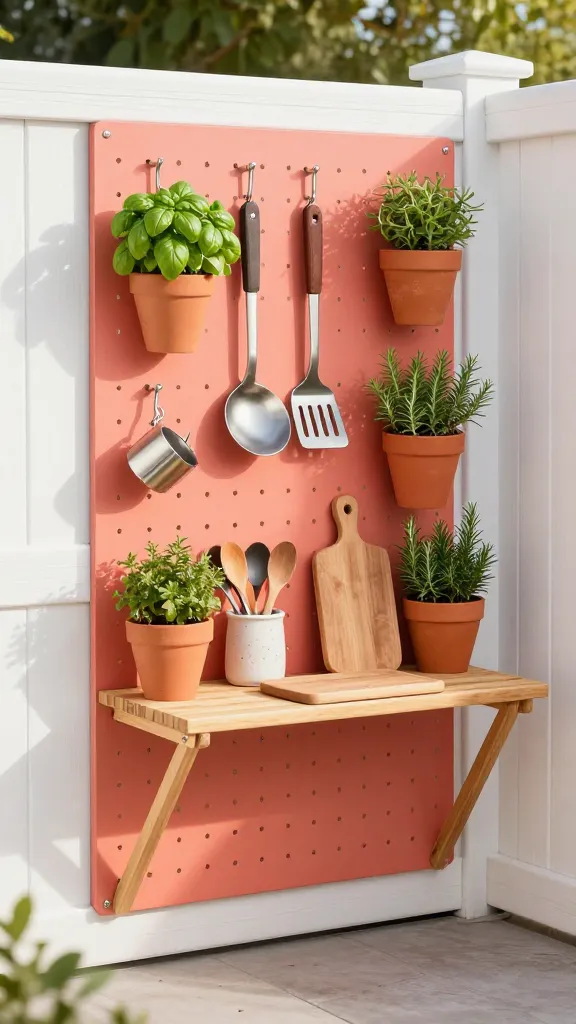
Mount a pegboard panel to your patio wall or fence and create a vertical cooking station with hanging storage. Add a small fold-down shelf for prep work, hang your tools on S-hooks, and incorporate small planters with fresh herbs.
Paint the pegboard in a fun color like bright coral or sunny yellow to make it a statement piece. The fold-down shelf gives you counter space when you need it and disappears when you don’t. FYI, this is genius for tiny patios where floor space is precious.
Rosemary
Use sturdy stems as skewers for veggie kebabs.
Loves Full SunMint
Perfect for instantly muddling fresh patio cocktails.
Grows FastThyme
Toss sprigs directly onto hot coals for aromatic smoke.
Drought TolerantWhat Makes It Work:
- Large pegboard panel ($60)
- Fold-down shelf brackets and wood ($80)
- Exterior paint ($30)
- S-hooks and pegboard accessories ($40)
- Small herb planters and soil ($35)
- Portable butane burner ($70)
Apartment dwellers and condo owners, this one’s for you. No permanent structures, maximum functionality, and you can take it with you when you move.
7. The Wheeled Wire Shelving Kitchen
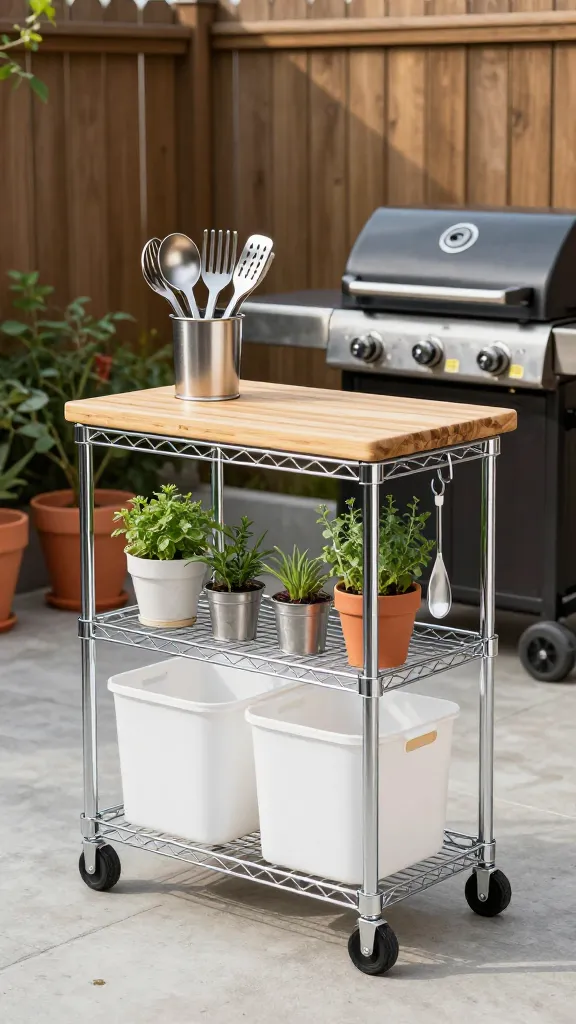
Those industrial wire shelving units from home improvement stores make surprisingly perfect outdoor kitchens. Get one with wheels, add a bamboo cutting board as a prep surface, and organize all your outdoor cooking gear on the shelves.
The open wire design lets everything dry quickly (huge win for outdoor furniture), and the wheels mean you can position it wherever you need it. Add weatherproof bins on the lower shelves for charcoal, lighter fluid, and other supplies.
Budget Build:
- Wire shelving unit with wheels ($120)
- Bamboo cutting board/prep surface ($45)
- Weatherproof storage bins ($50)
- Portable electric griddle ($80)
- Clips and hooks for tools ($20)
This no-build solution is perfect if power tools intimidate you or you’re renting and can’t make permanent changes. Assemble it in 20 minutes and start cooking.
8. The Stone Slab and Sawhorse Station
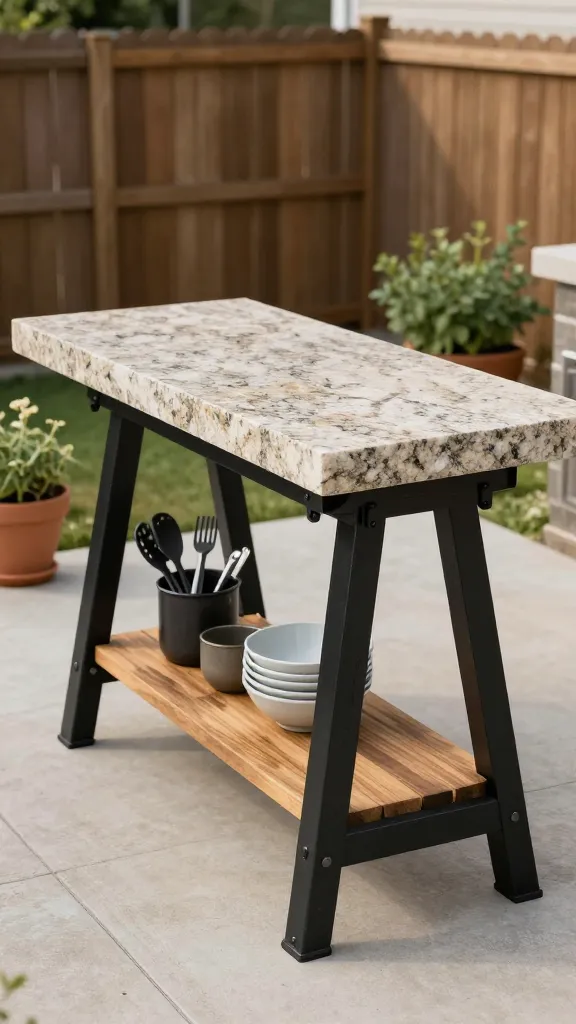
Buy a remnant stone slab from a countertop supplier (they’re usually selling them cheap to clear space) and mount it on sturdy sawhorses. The stone provides an incredible heat-resistant surface that looks expensive and high-end.
Choose granite or quartz remnants in neutral tones, then paint your sawhorses in a contrasting color like matte black or deep charcoal. Add a lower shelf between the sawhorses using a simple board for storage.
When shopping for remnants, always choose Granite over Quartz for outdoor setups. Quartz is manufactured with resins that will turn yellow and degrade under direct UV sunlight, whereas natural Granite is 100% UV-proof and heat resistant.
Materials Needed:
- Stone remnant slab ($100-200)
- Heavy-duty sawhorses ($80)
- Exterior paint for sawhorses ($25)
- Shelf board and brackets ($40)
- Rubber pads to protect stone ($15)
The best part? Stone is naturally weather-resistant and virtually indestructible. This setup will outlast pretty much everything else on this list.
9. The Outdoor Kitchen Command Center With Chalkboard
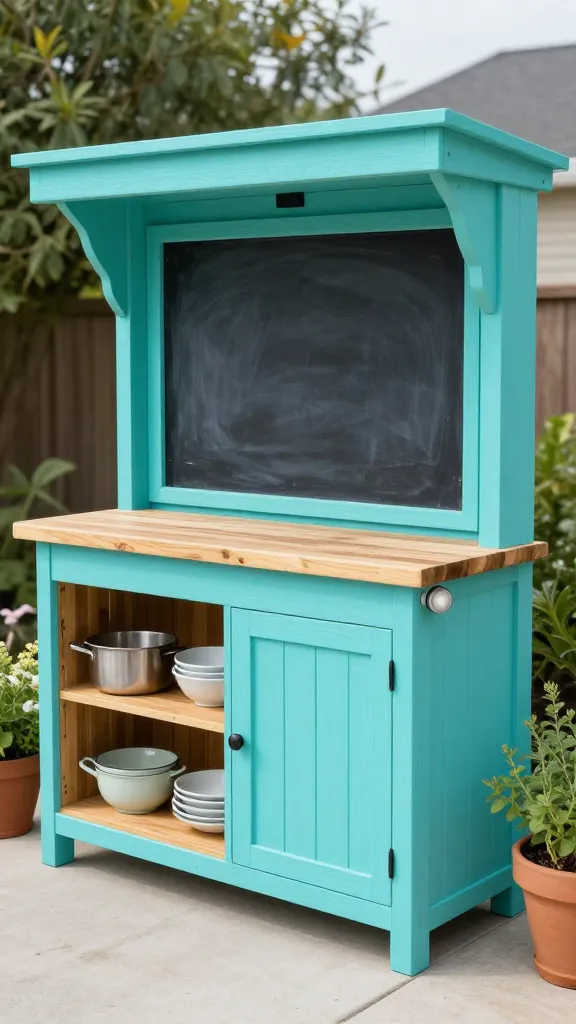
Build a simple frame with pressure-treated lumber, add a countertop, and mount a large chalkboard panel on the back for menus, grocery lists, or drink recipes. This interactive element makes outdoor cooking way more fun.
Paint the frame in a cheerful color like turquoise or coral, add open shelving on one side and closed cabinet space on the other using weatherproof cabinet doors from a home improvement store.
Mount solar lights underneath the upper shelf for evening prep work.
Build List:
- Pressure-treated lumber for frame ($120)
- Laminate countertop piece ($80)
- Large chalkboard panel ($40)
- Weatherproof cabinet doors ($60)
- Solar LED strip lights ($35)
- Paint and hardware ($40)
This design works beautifully for families with kids who love helping outside. Let them write the menu or draw pictures while you prep dinner.
10. The Repurposed File Cabinet Island
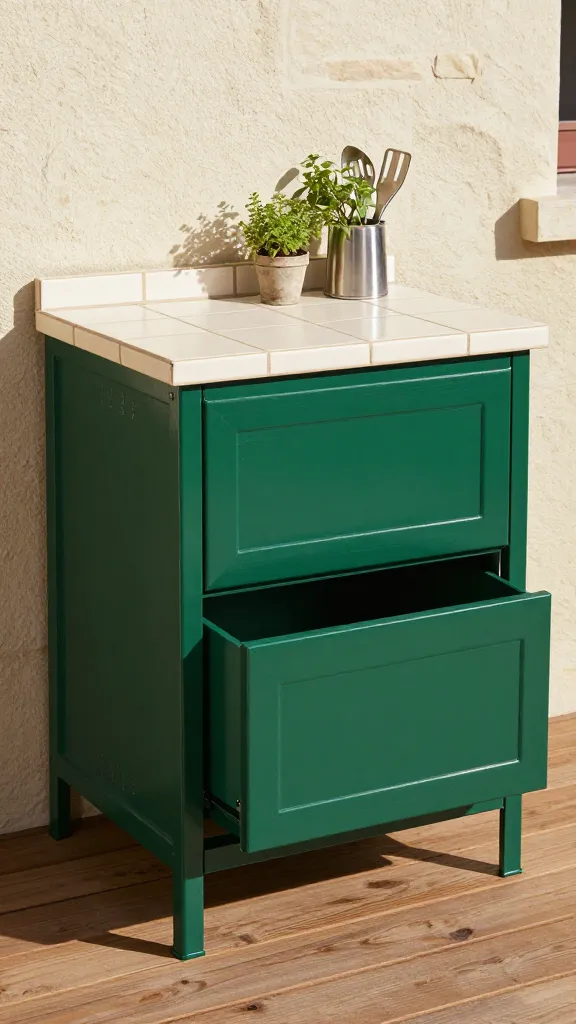
Old metal file cabinets from office supply liquidations cost almost nothing and transform into incredible outdoor kitchen bases.
Grab two matching cabinets, remove the top drawers to create a space for a small mini-fridge or storage, and top the whole thing with a tile countertop.
Spray paint the cabinets in a fun, durable outdoor metal paint (emerald green or navy looks amazing), add the tile using outdoor adhesive and grout, and you’ve created serious storage with a professional-looking counter.
The filing drawers hold everything from grilling tools to outdoor dining supplies.
Cost Breakdown:
- Two metal file cabinets ($40-80)
- Outdoor metal spray paint ($30)
- Ceramic tiles and supplies ($100)
- Tile adhesive and grout ($40)
- New drawer pulls ($25)
- Sealant ($20)
The filing drawers provide insane amounts of organized storage, which is something most outdoor kitchens seriously lack. Plus, metal cabinets laugh at weather and last forever.
Conclusion
Creating an outdoor kitchen doesn’t require a construction crew or a second mortgage. These DIY setups prove that creativity, elbow grease, and smart shopping beat expensive built-ins every single time.
Pick the design that matches your space and skill level, spend a weekend building, and get ready to become the host who never wants to go back inside.